resmed-logo
    txt

    AirMini

    Small. Smart. Proven

    • The smallest CPAP device in the world*
    • The quality of ResMed’s latest mask products – the 20 Series masks and AirFit P10 for AirMini
    • Premium carry bag and accessories for therapy on the go
    • AirMini app offers an intuitive and easy setup process
    • Waterless humidification for portable convenience**

    * Based on volume comparisons done by ResMed internal testing prior to the time was published.

    **Not available with F20 Series (full face) masks

    Small

    Suitable for use at home or while you’re away. Thanks to AirMini’s small size and portability, you’ll never have to choose between therapy performance and freedom again. In total volume, AirMini is the smallest CPAP device ever manufactured.

    Smart

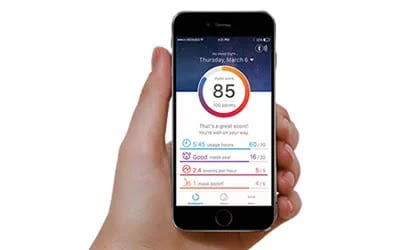
    Stay connected to your therapy. The AirMini app allows you to customise your therapy comfort to your individual needs and view your progress with ease.

    Proven

    Rest assured. AirMini features the same established algorithms as ResMed’s AirSense range of sleep therapy devices.

    Waterless humidification

    Enjoy the warmth and comfort of humidification without the hassle.
    Our all-new HumidX system delivers a similar level of humidification to our market-leading bedside devices* with the added convenience of being a compact waterless system.**
    * In a typical overnight and dry environment, with temperature of 16-22°C and Relative Humidity (RH) of 20-30%, the HumidX provides humid air of 70-80% RH – similar to a CPAP heated humidifier on a mid-range setting with unheated tubing.
    **Not available with F20 Series (full face) masks

    Simplify your bedtime routine

    Masks designed for you

    AirMini has been designed to work exclusively with our latest range of mask products – our 20 Series masks and AirFit P10 for AirMini.
    Choose from a range of mask options designed to deliver quiet, comfortable and stable therapy performance from your AirMini device.

    Stay connected

    A smartphone app that allows you to manage your comfort settings and view your therapy progress, the AirMini App helps ensure you are swiftly setup for therapy – with guided setup videos and daily sleep scores always just a menu screen away.

    Therapy for your lifestyle

    With a variety of accessories, the AirMini system is designed to suit your lifestyle.
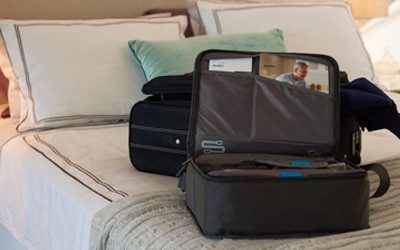
    A hard case offers protection – while a premium carry bag allows you to transport the entire AirMini system (tubing, mask and device) with ease. The AirMini bed caddy even allows your AirMini to be secured in a variety of bedside configurations for greater convenience and discretion.

    Support

    AirMini Patient Setup Usage Video


    Setting up your machine

    • Plug the power supply unit into your machine and then into the power outlet.
    • Connect the grey end of the air tubing to your machine.


    Adding optional humidification

    (for AirFit N20 or AirFit P10 for AirMini only):


    • To use the optional HumidX or HumidX, twist open the connector.
    • Insert the HumidX or HumidX Plus them inside, with the blue or grey side facing down towards the tube.
    • Close the connector by twisting its ends back together until they lock into place.


    Connecting your machine and smart device


    • Ensure you have the latest version of the AirMini app installed on your smart device. If not, download it from the App Store or Google Play depending on your device.
    • Also ensure Bluetooth is enabled on your smart device. Refer to your smart device’s user guide for instructions as needed.
    • Open the AirMini app and you’ll be greeted with a welcome screen.
    • Accept ResMed's Terms and Conditions and Privacy Policy to continue.
    • When prompted by the AirMini app, press the Bluetooth button on your AirMini machine.
    • When the light on your machine flashes blue, Bluetooth is enabled and it is ready to connect.
    • On the smart device, tap Connect.
    • Wait until your machine appears in the accessory selection list.
    • Select your machine from the list to connect.


    Authenticating your device


    • The first time you pair your machine with your smart device, you will need to authenticate it by entering the four-digit key located on the bottom of your machine.
    • When successfully connected, the Bluetooth connection icon will appear in the top right corner of the screen.


    Starting therapy on the Sleep screen


    • Enter the Sleep screen by pressing on Sleep on the Navigation tab.
    • The Sleep screen is split into two tabs, Therapy and Mask Fit. You can toggle between the Therapy screen, to access comfort settings, and the Mask Fit screen, to check for air leaks around your mask.
    • To start therapy, press start on your Therapy screen.
    • To stop therapy, press stop from the same menu.


    Adjusting comfort settings


    • Enter the Sleep screen and click on options in the Therapy screen.
    • Tap the setting you wish to adjust.
    • Use the spinner or switches to select the required setting.
    • Do this process for as many settings as needed.


    The Dashboard


    • Enter your Dashboard screen by pressing on Dashboard in the Navigation tab. If your AirMini machine is connected to the AirMini app, the Dashboard will provide you summary data and a sleep score for your recent therapy session.
    • You can also access previous days of sleep score information by clicking on the dropdown arrow next to the current date.
    • Tap on any therapy session to view your sleep score and sleep swadata for that date.

    AirFit P10 for AirMini Usage Videos


    Maintenance and inspection

    • Regular inspection of your mask and its components for signs of damage is important to maintain optimal performance of your mask.
    • For a thorough inspection, you should first disassemble the mask as per instructions in your user guide and inspect each part individually.

      Check the mask frame and tube

    • Examine both the inside and outside of the mask tube for any holes or tears. If damage is found, the frame will need to be replaced.
    • Hold the frame and gently pull on each arm of your mask to ensure they are firmly attached and will provide good support.

      Checking the nasal pillows

    • Examine your nasal pillows inside and out for general wear and tear, blockages, damage and deformed pillows.
    • A light squeeze on the sides of deformed pillows can help bring them back to shape. Replace them if they are damaged or no longer fit well.

      Checking the headgear

    • Hold the headgear in one hand and run your other hand along its length while stretching at various points to check for tears and its elasticity.
    • If the headgear is torn, lost its elasticity or has damaged seams, you should replace it.

    These instructions are for general information purpose only. For full details consult the user guide.

    Disassembly


    For N20 users


    • Disconnect the connector from the mask by pressing on its side buttons and pulling away.
    • Disconnect the vent module from the AirMini tubing by twisting them away from each other.
    • Disconnect the vent module from the mask tube by twisting them away from each other.
    • If HumidX or HumidX Plus was used, remove it from the vent module.


    For F20 users


    • Disconnect the connector from the mask by pressing on its side buttons and pulling away.
    • Disconnect the F20 connector from the AirMini tubing by twisting them away from each other.


    For P10 users


    • Disconnect the vent module from the AirMini tubing by twisting them away from each other.
    • Disconnect the vent module from the mask tube by twisting them away from each other.
    • If HumidX or HumidX Plus was used, remove it from the vent module.


    AirMini


    • Disconnect the AirMini tubing by pressing on the side of the grey cuff and pulling away.
    • Unplug the power supply unit from the power outlet and the machine.

    Daily cleaning


    For N20 users

    Note: Do not wash or wet the HumidX / HumidX Plus. When not in use, store in a clean and dry place.


    • Clean and check the N20 connector by hand daily. Never wash it using a dishwasher or washing machine.
    • Remove the HumidX before proceeding with cleaning.
    • Wash the connector in warm water (~30°C or 86°F) and mild liquid detergent.
    • Clean the connector using a soft bristle brush, with particular attention paid to the vent holes on the inside.
    • Rinse well under running water, and then shake to remove excess water.
    • Air dry out of direct sunlight, and check for dirt or dust before use.


    For F20 users


    • Clean and check the F20 connector by hand daily. Never wash it using a dishwasher or washing machine.
    • Wash the connector in warm water (~30°C or 86°F) and mild liquid detergent.
    • Clean the connector using a soft bristle brush, with particular attention paid to the vent holes on the outside.
    • Rinse well under running water, and then shake to remove excess water.
    • Air dry out of direct sunlight, and check for dirt or dust before use.

    Inspection and replenishment


    For F20 users


    • Check the F20 connector daily for signs of damage or blockages caused by dirt and dust.
    • The connector should be replaced at least every six months or if there are signs of damage.


    For N20 users


    • Check the N20 connector daily for signs of damage or blockages caused by dirt and dust.
    • The connector should be replaced at least every six months or if there are signs of damage.


    AirMini tubing


    • Check the AirMini tubing daily for any holes, tears or cracks.
    • The tubing should be replaced at least every six months or if there are signs of damage.


    AirMini air filter


    • Check the AirMini air filter for any holes, tears, cracks, or blockages caused by dirt or dust.
    • The air filter should be replaced at least every six months or if there are signs of damage. It cannot be washed.
    • To change the air filter, slide the air filter cover off and replace the old air filter with a new one.
    • Attach the air filter cover on again, and ensure it is fitted at all times to prevent water and dust from entering the machine.


    HumidX and HumidX Plus


    • Check your HumidX or HumidX Plus daily for signs of damage or blockages caused by dirt and dust. They cannot be washed.
    • HumidX and HumidX Plus must be replaced within 30 days after opening the packaging or if there are signs of damage.

    Humidification


    • To insert the optional HumidX / HumidX Plus, for N20 or AirFit P10 for AirMini users, open the connector by gently twisting.
    • Grip the HumidX / HumidX Plus at the edges, with blue / grey side facing down towards the tube, and place it inside.
    • Close the connector by twisting its ends back together until they lock into place.
    • HumidX and HumidX Plus must be discarded and replaced within 30 days after opening the HumidX / HumidX Plus packaging.

    Travelling with your equipment

    Traveling

    Travelling with your therapy equipment is now made easier, thanks to ResMed's device technology.
    AirMini App

    2019-05-22

    AirMini app enables you to use your AirMini machine right from the palm of your hands!

    20 series Masks

    2019-05-22 (1)

    AirFit P10 for AirMini combined with AirMini represents ResMed’s smallest sleep therapy system.
    Accessories best sellers

    HumidX_HumidXPlus_Combined

    HumidX system

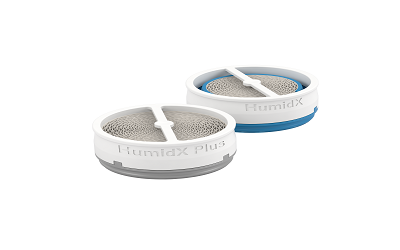
    Exclusive to AirMini, HumidX and HumidX Plus are small heat and moisture exchangers (HME) that are designed to provide comfortable and effective humidification.

    Read more
    AirMini_MountSystem_heroimage

    AirMini mount system

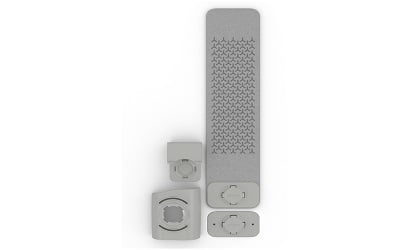
    The ResMed mount system allows the AirMini device to be secured to various points such as a bedframe, bedside table, wall or airplane seat pocket.

    Read more
    airmini_travelbag (1)

    AirMini Travel Bag

    Take your sleep therapy everywhere you go with the AirMini Travel Bag. Small and compact, it’ll fit the whole solution to keep everything together – so it’s always ready when you are.

    Read more

    *Combined responses of those expressing a preference in an independent patient survey in the USA, UK, Germany, France and Australia, from May 2015. Visit www.resmed.com/maskbrand